Showing posts with label Recipes. Show all posts

Sunday, January 27, 2013

Who can resist baby smiles?

Not this momma. As I type this post, Hazen is crashed in his carrier and I have done just about everything thing around the house that I can do while wearing a baby.  So, I thought I would put together a post of all the cute little shots of his sweet smile that I've captured over the last couple of months. 

And sense he's still sleeping, I thought I'd include some links to recipes I've tried out over that last few months that I thought were most delicious...(no pictures)

Cranberry Chutney (this was amazing at Thanksgiving!)
Gooey Brownies (with homemade mocha ice cream for my mom's birthday.  You had to forget your calories for a day with this one!)
Spaetzle (Kam got me a spaetzle maker for christmas after we tried German food trying to coax Hazen outta my tummy.  We tried all types of different foods that week to see if some nationality's cuisine would get him excited.  At the moment we are boiling a chicken to make spaetzle chicken soup.)
Cabbage Rolls (I loosely followed this recipe.)
And my latest cooking obsession is homemade granola bars.  I don't have a recipe to share for that one. I've been just making it up as I go.  On my third batch...I'm getting pretty good.

Oh, and Hazen is waking up.  Thanks for hanging out with me while he slept :)

Friday, January 13, 2012

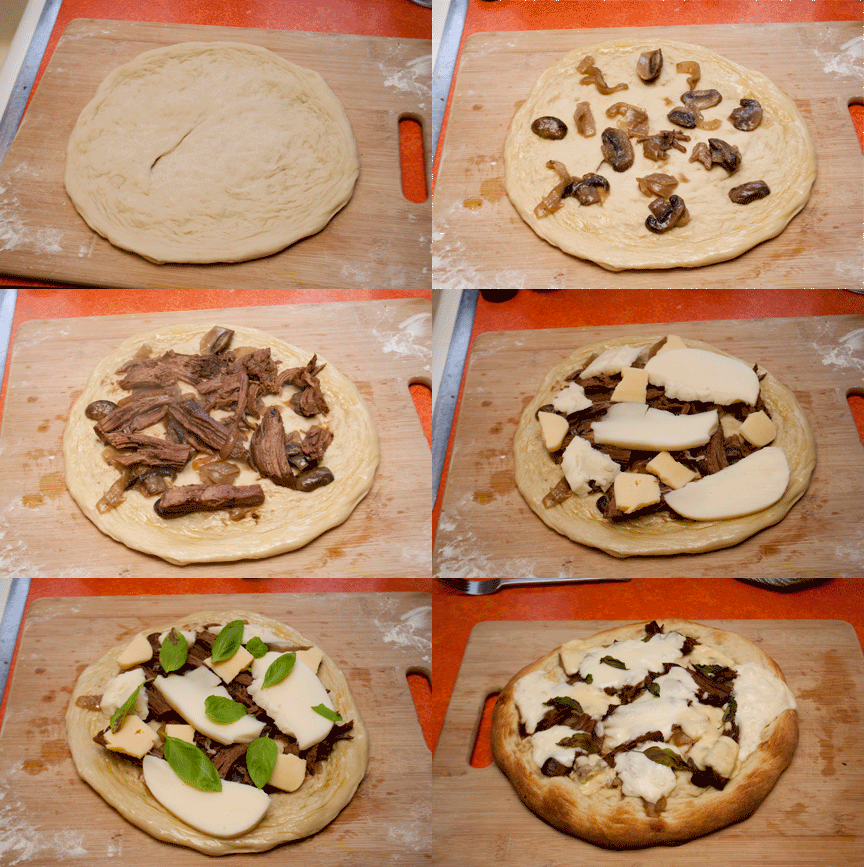
French Dip Pizza

Ok, I got a little creative.  It was a good thing.
What you'll need:
1 24 hour pizza crust (split the dough in half for small, or use the whole thing for a medium-large size pizza.  This will be a half size.)
1/2 cup mozzarella (grated or sliced, your choice)
1/4 cup gouda  (grated or sliced, your choice)
1/2 cup caramelized onions and mushrooms
1 - 2 cups left over roast beef sherds and pieces
2 cups au juice 
7 or 8 fresh basil leaves

Prepare pizza crust to these instructions and preheat pizza stone to 450 to 500 depending on how hot your oven gets.  Saute about 1/4 of an onion and 3 or 4 sliced button mushrooms in a little butter.  In a small pan, make up au juice and place roast beef pieces into juice.  Bring to a boil and reduce heat, let simmer until ready to use.  

Once dough is stretched, make sure it still slides easily on the board.  If not, add a little more flour. Brush the outer rim with olive oil.  Layer onions and mushrooms, roast beef straight from the au juice (don't shake it, get some of the juice on there), cheeses and basil leaves onto curst.  You can do what you wish with the left over au juice.  Slide pizza off cookie sheet or cutting board onto pizza stone.  Bake for 6-7 minutes.  Be sure to remove pizza from stone once done or it will continue to burn the crust.  Let rest for 3 minutes before slicing.
This was so good, and we had just enough roast beef left over that we had this for dinner the next night too.  Its kind of a make it when you can type of pizza.  It's not everyday that you have roast beef laying around.  But, next time you do, keep this in mind!  You will be happy with yourself if you do.  Enjoy!

Wednesday, January 11, 2012

Alton Brown's 24 Hour Pizza Dough

The first thing I had to make with my new mixer was pizza dough.  And just to step it up a notch, I made Alton Brown's recipe.  He lets the dough rise in the fridge for 24 hours before making the pizza.  It's a pretty basic dough, and I did modify his recipe a tiny bit.  So here goes...
What you'll need:
  • 2 tablespoons sugar
  • 1 teaspoon salt
  • 1 tablespoon olive oil
  • 3/4 cup warm water
  • 1 3/4 cups bread flour (Winco had both white and wheat in bulk)
  • 1/4 cup gluten flour (again Winco bulk.  This was my change from his recipe.  He used 2 cups of the bread flour.  I read somewhere tp use a small amount of gluten flour for chewier crusts)
  • 1 teaspoon instant yeast
  • 2 teaspoons olive oil
Place all ingredients minus 2 teaspoons olive oil into your mixer and use the paddle attachment to mix until combined and forms into a loose ball.  Switch to the hook and knead for 15 minutes.  Do the "window" test by tearing off a small piece of dough and form in into a disk.  Stretch the disk until thin to so it is taunt, it if tears before you can almost see through the membrane, knead for another 5-10 minutes.  

Roll dough into a smooth ball and place into a stainless steel or glass bowl. Add 2 teaspoons of olive oil to the bowl and toss ball to coat. Cover with plastic wrap and refrigerate for 18 to 24 hours.

After the rise period, remove dough from fridge and split with a knife or dough scraper into two equal pieces (about 4 slices) or leave whole (for about 8 slices).  Slightly dampen counter top with water and roll dough on counter until it tightens into a ball.  Place back into bowl and cover with a kitchen towel.  Let rest for 30 minutes.  Do the same process with other half of dough if you split.  Spray the inside of a ziplock bag with cooking spray and refrigerate for up to 6 days or freeze for a month.

Put your oven rack on its lowest setting and place pizza stone into it.  Turn up oven to its highest setting.  I put mine at 450 because it gets CRAZY hot.  Flour a wooden cutting board or a peel if you have one.  Stretch your dough on the floured surface into a disc rotating after each stretch.  If dough keeps wanting to shrink back, let rest a few more minutes to warm up to room temp.  Brush the rim or curst of dough with olive oil and add whatever toppings you like.  Carefully slide pizza onto stone and bake for 6-7 minutes or until cheese is bubbly.


I officially don't need to go out for pizza anymore.  This, as far and my pizza tastes are concerned, is the perfect crust.  Chewy, soft, slightly crispy.  If you are coming over to my house sometime in the next 6 months for dinner, I can guarantee you that I will be cooking pizza for you.  Enjoy!

Wednesday, January 4, 2012

Cream of Mushroom Chicken and Vegetables


Have you ever started cooking something with no idea what you were really planning.  Well I did, and this is where I ended up.  I did step one.  I sort of had a plan with what I was going to do with the cooked veggies after they were soft, but ended up making homemade cream of mushroom soup instead.  Who doesn't remember their mom making something like this when they were kids?  I am also really into wild rice blends and quinoa right now, so we'll see where that goes.

Cream of Mushroom Chicken and Vegetables
4-6 chicken thighs
2 cups carrots diced
2 cups celery diced
3 cups mini yellow potatoes halved
1 medium onion sliced
Any other vegetable you want to add (this is all I had in stock at the time)

Remove skin and excess fat from thighs.  Place sliced onions in bottom of slow cooker.  Even lay chicken over onions.  Add remaining vegetables over chicken and cook for 3 hours on high.  Make soup recipe as follows.

Mushroom Soup
2 tablespoons olive oil
5 cups chopped mushrooms
1 generous cup chopped onion
2 cloves garlic minced
1 cup chicken or vegetable stock
1 teaspoon dried thyme
1/2 teaspoon rosemary
1/2 teaspoon dried oregano
1 teaspoon white pepper
2 tablespoons flour
1 teaspoon butter
2 cups milk (your choice on %, I used 1/4 cup whipping cream and 1 1/2 cups 2%)

Heat oil in a large skillet over high then add mushrooms.  Saute until browned (5-7 minutes).  Add onion, saute for another 3 minutes until you can see onion start to turn translucent, then add garlic and butter.  When garlic becomes fragrant, add stock, thyme, rosemary, oregano and pepper.  Cook until stock reduces almost out (about 5 minutes) and add flour and mix to coat mushrooms.  Add milk and stir with a wooden spoon to combine, being sure to scrape up all the bits from the bottom of the pan.  Return to boil then reduce and heat to medium low stirring fairly frequently until thickens (about 3-4 minutes).

Remove vegetables from slow cooker (don't worry if you don't get then all) and add to mushroom soup.  Mix to coat veggies and pour back over chicken. Allow to cook about 2 more hours on low.  Serve with wild rice.


And comfort food strikes again.  Enjoy!

PS. This is even better the second night!

Saturday, December 17, 2011

Balsamic Glazed Meatloaf

I love meat-loaf!!!  No shame in admitting it.  None.  Meatloaf sandwiches, probably in my top 10.  I have to share tho... I remember when I was a kid and my mom would make meatloaf sandwiches for my dad, I thought that was the NASTIEST!!! thing you could ever ever... ever make for someone.  Well, I was MISS'N OUT!  Now I make meatloaf just for the sandwich.  I went out on a limb and tried something new with this one, no regrets, it was perfect!
Balsamic Glazed Meatloaf
1 pound ground pork
1 pound lean ground beef
1 tablespoon olive oil
1 large carrot grated
2 stocks celery chopped
1/2 large onion chopped
3 cloves garlic minced
1 turnip chopped
1/4 cup ketchup
2 tablespoons balsalmic vinegar
1 cup bread crumbs
2 large eggs
1 teaspoon pepper
2 tablespoons worcestershire sauce
2 tablespoons sweet hot mustard
2 tablespoons brown sugar

Glaze:
1/2 cup ketchup
1/2 cup balsamic vinegar
2 tablespoons brown sugar
1 teaspoon black pepper
1 tablespoon worcestershire
1 teaspoon hot sauce

Add olive oil to a pan and heat over medium heat.  Add carrot, celery, onion and garlic and saute until veggies are tender.  Set aside and allow to cool.  Preheat oven to 350.  Add remaining ingredients into a large bowl.  Once veggies are cool enough to touch, add to bowl and mix with hands until well combined.  Spray loaf pan with cooking spray.  Place meat into pan and form into a large mound being sure to leave at least 1/2 inch  on the sides from the top of the pan.

Place all glaze ingredients into a small bowl and whisk until combined.  Pour half over top of meatloaf being sure to cover the top evenly, most of it will run down into your moat.  Bake for 60 minutes.  Place remaining glaze into a small sauce pan.  Just before timer goes off, reduce glaze by half over medium high heat, stirring fairly frequently.  Once timer goes off, add a little of the thickened glaze to top of meat loaf and bake for another 15 minutes.  You can use a meat thermometer of you'd like to check doneness, ours was perfect.  Use remaining glaze as a dipping sauce.


This baby was AWESOME!  There was enough left over for sandwhiches the next day (my fav) and for some random meatloaf soup I whipped out.  The glaze is soooooo packed full of tangy sweet flavor, it was heaven.  So make it now! Enjoy!

ps. sorry for the weird photos, lovely winter light!

Tuesday, December 13, 2011

Vanilla Cranberry Walnut Banana Bread

I have never bought fresh cranberries before. I saw some at the grocery store the other day and impulse grabbed them.  So they sat for a few days before I came up with something to do with them. This was a perfect start!
Vanilla Cranberry Walnut Banana Bread
What you'll need:
2 over ripe bananas
1 egg
1 cup plain greek yogurt
1/2 stick butter
1/4 cup granulated sugar
1/4 cup brown sugar
1 teaspoon pure vanilla
1 vanilla bean
1 cup flour
1 teaspoon baking soda
1/2 teaspoon salt
1/2 cup chopped walnuts (I pulsed mine pretty small in my food processor)
1 cup fresh cranberries

Preheat oven to 350 degrees. Spray or grease your loaf pan, set aside.

Cream butter & sugars.  Add in egg, yogurt, bananas, & vanilla extract and seeds scraped from the vanilla bean and blend until well combined. Mix in flour, baking soda & salt.  Fold in walnuts and cranberries.  Pour into a greased loaf pan and bake for 50-65 minutes or until toothpick comes out clean.  I usually start checking mine at about 50 minutes.

I made two loafs and shared one with some friends.  I really loved the tartness of the cranberries in contrast of the sweet bread.  Has anyone ever made the sugared cranberries before?  I might try that soon.  They almost look to pretty to eat though. Enjoy!

Sunday, December 11, 2011

Paella

Going into this, I knew it wasn't going to be amazing paella with a crusty bottom and perfect seafood flavor absorbed into the rice.  For starters, I don't have a cast iron pan, and I didn't have any shrimp or mussels on hand.  So it was a really tasty rice dinner with a paella inspired flair.  Even though it wasn't traditional, it still made a good dinner with fairly little fuss.

Paella (of sorts)
What you'll need:
2 large sausage links
1/2 pound or about 6 chicken tenders
3 cloves garlic smashed and coarsely chopped
1 teaspoon ground mexican oregano
1 medium onion sliced in large pieces
1 1/2 red pepper sliced (you could use a combination of red and green, I only had red on hand)
1 large pinch saffron (larger the better)
1 1/2 cups hot water
1 cup frozen peas
1 cup carnaroli or arborio rice (or any short grain)
1 cup dry white wine
2 cups chicken stock
1 can large black olives
2 teaspoons fresh cracked black pepper

Add saffron to hot water and let steep while you cook the meats. In a large pan with a lid, cook sausage.  Remove from pan, slice into bite size rounds, set aside.  Leave sausage drippings and little burned bits.  Cook chicken, slice into bite size pieces, set aside with sausage.  Cook onion and red/green pepper until onions are translucent and tender.  Add garlic, oregano and one teaspoon black pepper. Saute until garlic is fragrant.  Add wine, saffron tea, and chicken stock.  Bring to a boil and rice.  Give it a stir, reduce heat to medium low and let cook for 10 minutes.  Add chicken, sausage and black olives.  Now cover and let cook for 30 minutes.  Rice should have absorbed most of the water but still quite a bit has pooled at the top.  Add peas and remaining pepper and fold until evenly distributed.  Test rice, if it doesn't seem like you have enough liquid left in the pan you may need to add another 1/2 cup water.  Cover, do not stir again, and let cook for another 15-20 minutes or until all liquid has been absorbed and the rice is begging to brown on the bottom.  Make sure your burner is on medium low.  Thats it!


So thats my half effort of paella.  Someday I'm going to make it for real.  You could add shrimp in there when you add the peas and it would get it one step closer to the real thing.  The reason I wanted to make Paella is because Costo had this little jar or saffron in the spices a few weeks ago and I couldn't pass it up (it was a little pricy though).  Paella was one dish I knew required saffron.  I want to try a dessert with it next.  So stay tuned for that!  Enjoy!

Sunday, December 4, 2011

Vegetable Dip

Last night we went to our friends from dinner and fun!  They asked me to bring veggies and dip so I grabbed a box of cream cheese and just started adding.  You really can't go wrong with anything that has a whole box of cream cheese.  So yeah, it tasted good.  Mrs Butters, Paula Dean, was making Tzatziki sauce on the TV the other day, but instead of making the half way healthy normal version, she made it fattening as hell!  So that was sort of my inspiration.  She didn't use cream cheese, but it was a start to a yummy idea.
Glorified Tzatziki Vegetable Dip
1 package cream cheese (I used 1/3 fat)
1 cup sour cream or greek yogurt (I used half and half of each)
juice and zest from 1 small lemon
1/4 cup finely chopped green onion
1 small cucumber
1 tablespoon ranch seasoning
1 clove garlic minced
1 tablespoon dill
1/2 teaspoon salt

In a medium bowl, blend together cream cheese, lemon and zest  and sour cream/yogurt with a hand mixer.  Cut cucumber in half and scrape out seeds. Place in food processor and pulse until chopped.  Pour cucumber into mesh strainer and press and squeeze in your hand until no more water comes out. Should have around 1/4 cup but a little more is ok.  Add cucumer and remaining ingredients to bowl and mix until combined.  Serve with fresh sliced veggies.


Thank you to Eric and Julie for fun times last night.  Savory Saturday is Savory Sunday this week because Kam really wanted to leave and I didn't have time to finish this post.  They had us over for a belated birthday dinner and Julie made chocolate fondue!  Needless to say, it was awesome!  Enjoy!

Saturday, November 26, 2011

Split Pea and Sweet Potato Soup

Every year I have to make split pea soup. On our birthday, we decided to go over to the local meat market and buy some nice steaks to have for birthday dinner.  To my joyful surprise, they had smoked ham hocks in the case too!  "I'll take the largest one please!"  And that's when split pea soup became our destiny...and I have to admit, I'm surprised by the short ingredient list.  I thought I forgot something, but it's all there.  I'm not sure where the sweet potato came from, I was looking at the veggies I had and just thought it might be a perfect addition.  It was.


Ham and Sweet Potato Split Pea Soup
What you'll need:
1 large ham hock
4 cups diced carrots divided
3 cups chopped celery divided (use heart and leaves if you can)
1/2 large onion chopped
8 cups chicken stock
3 cloves garlic
1 medium sweet potato diced and divided
1 bag dried peas
1 teaspoon fresh ground pepper

In a large soup pot, add chicken stock and ham hock and bring to a boil.  Reduce to a slight boil and let cook for about 4 hours.  Meat should come off the bone in big chunks.  Don't worry about shredding it, it will continue to fall apart as you make the soup. (You may want to add a little more ham chucks.  We added a small pack of the packaged ham cubes.)

Once ham has fallen off bone, try and remove (if any) the bits of skin/fat that are attached to the meat.  Add garlic and pepper and half of each carrots, sweet potato, onion, and celery.  Allow to cook, still at a small boil, until soft (about 15 minutes).  Once vegies are soft, add the bag of dried peas. Reduce heat to medium low.  Stirring occasionally let peas cook for 30-45 minutes or until you can see that they are starting to absorb the liquid and break down.  Once peas start to mush, but you can still see some of their shape, add remaining vegetables.  The soup will be done when vegetables are soft and soup is thick.  The peas shouldn't be visible anymore.


If you wanted to make this quicker, you could skip the ham hock and just use the packaged ham chunks, but you would loose the awesome flavor that develops from boiling the ham bone.  Winter comfort food? Yes please! Enjoy!

Labels